Wednesday, October 20, 2010

Caramel Apples

I know these aren't rocket science....but they are delicious and a fall fave!  So here they are!!  :)

What you'll need:
Apples
Craft Sticks
Caramels
Waxed Paper with butter
Nut (optional)
Chocolate chips (optional)
 1.  Start by unwrapping your caramels. Rumor has it that they sell unwrapped ones...but I've never seen them.  You'll need about 10 caramels per apple.  So, if you are doing 2 apples use 20 caramels or 4 apples and 40 caramels, and so on.  :)
2.  Wash and dry your apples, remove stems and insert one craft stick into each apple. Set aside.
3.  Place unwrapped caramels in a small pot on medium-low to medium heat, stirring constantly until the caramels are all melted.
 4.  Prepare a plate with the waxed paper smeared with butter.  (This is where the finished apples will go!)
5.  Once the caramel is all melted start dipping your apples.  Be careful to not get any hot caramel on your fingers, it hurts.  Trust me, I got quite a glob on my thumb, and OUCH!  Anyway, dip the apples in the caramel until well covered like so.  Then scrape some extra off the bottom and....
 6.  If desired you may roll the freshly dipped caramel apples in nuts....or just move on to step 7.
 7.  Place caramel apple on the prepared plate, and move on to the next apple until all are done!
 8.  Once all the apples have been caramelized ;) you may want to add some chocolate.  You can easily do this by place about 1/4 c. chocolate chips in a microwavable bowl for 15 seconds at a time until they are melted.  (Stir in between each 15 seconds.)  Then place the melted chocolate in a plastic bag like so....
 9.  Then snip off a little piece of the plastic and you've got a little chocolate drizzler!  :)
 10.  Drizzle chocolate till your heart is content!  You can also use white chocolate chips, butterscotch, etc...
Refrigerate for about an hour to help caramel set up.  Enjoy!!!  :) Happy Fall!!!

Mickey D's Biscuits: Take II

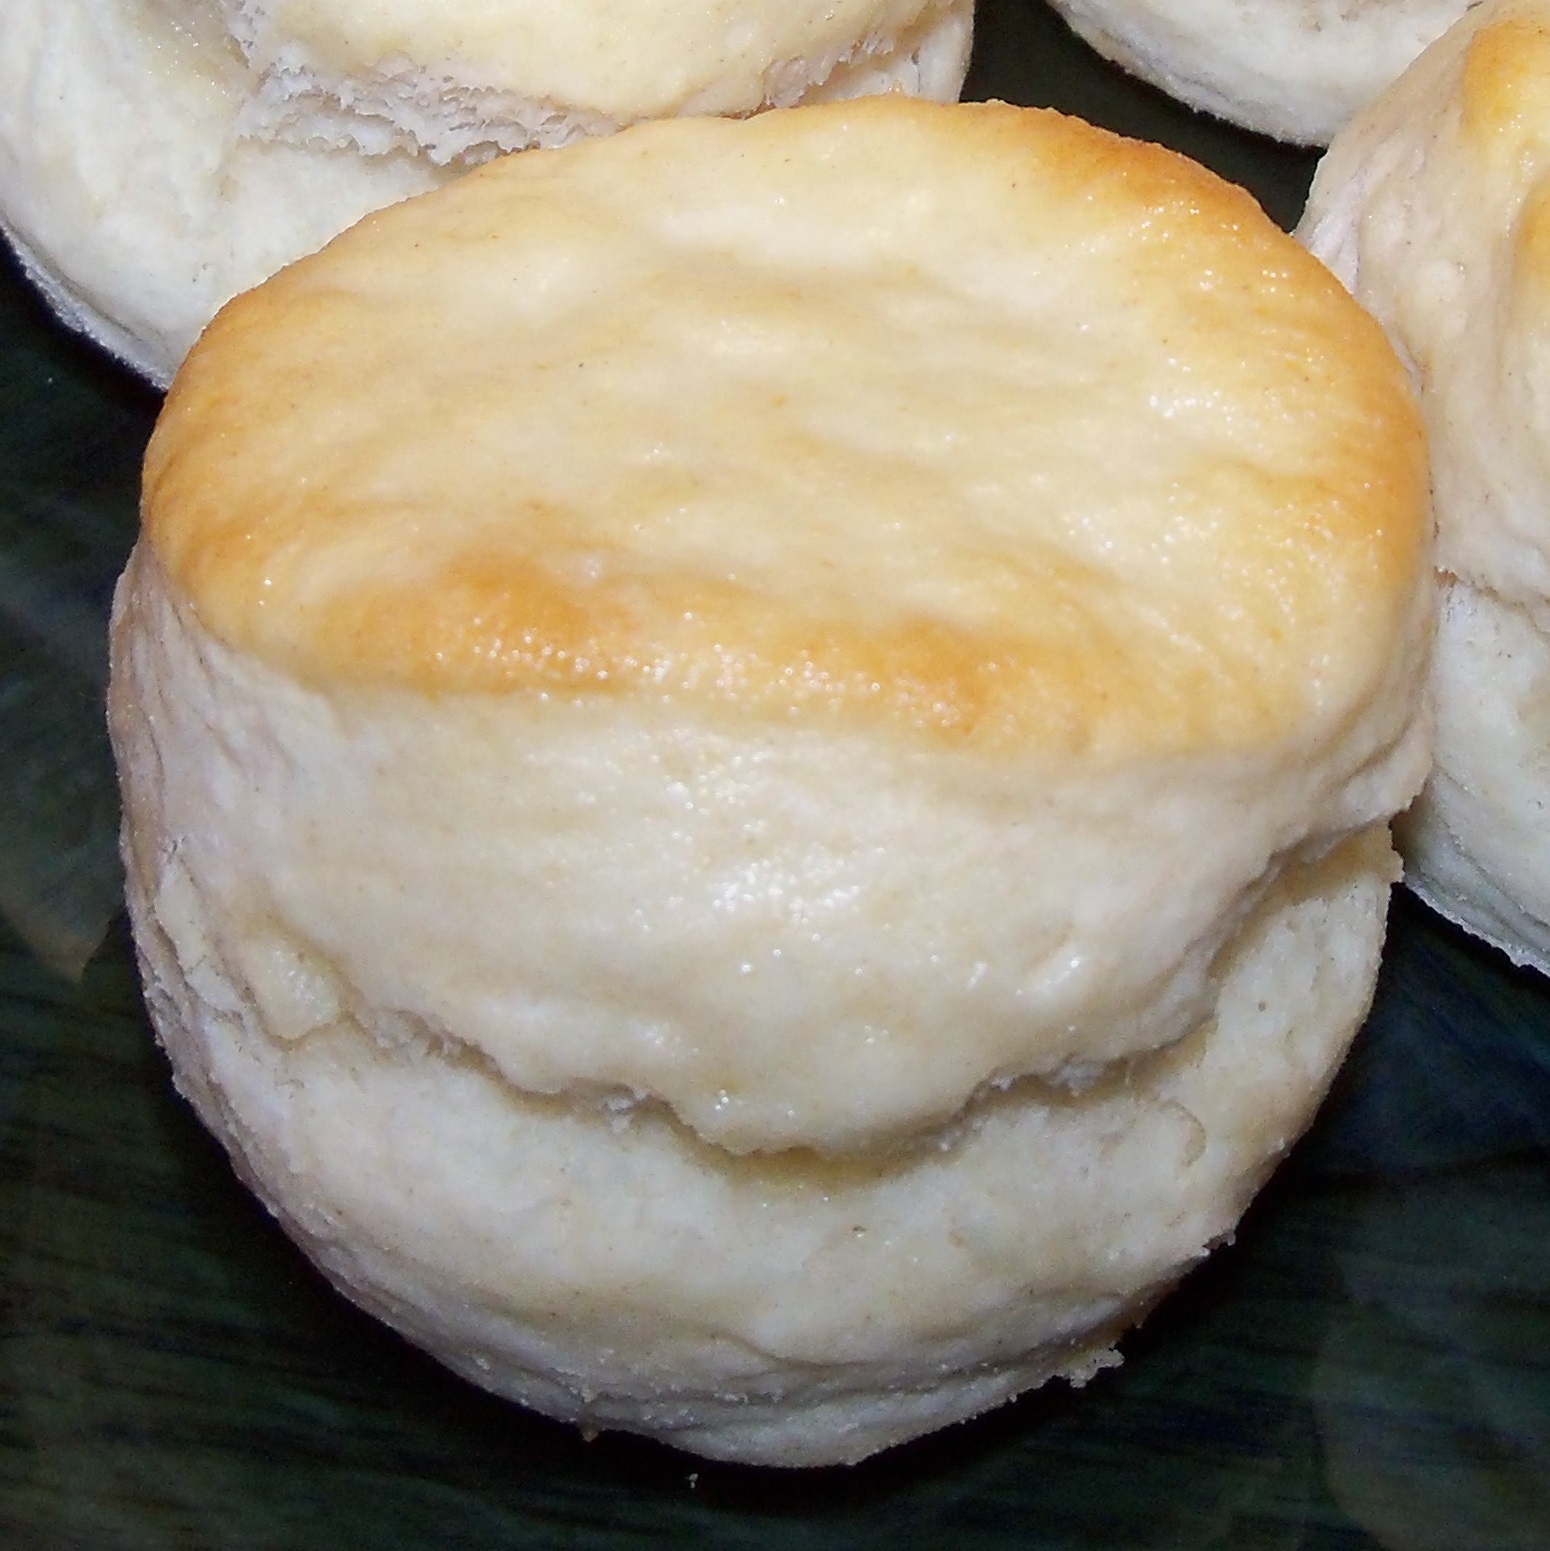
Ok, I made another try at making McDonald's biscuits at home.  This time I just made up my own recipe.   (Since I still have that fat free buttermilk to use up...)  They turned out really well, but they still don't quite taste like McDonald's....they are still good biscuits though!  :)


Ingredients:
1/2 c. Buttermilk
1.25 c. Self Rising Flour
4 T. Butter, melted
1 T. Sugar

Just mix together buttermilk, self rising flour, sugar and most of the butter.  Roll out dough and cut into biscuits.  Place biscuits on baking sheet and brush with remaining butter. 
  Bake for 10-15minutes at 350 degrees.  Should yield 6 biscuits.

 Enjoy!  :)

Monday, October 18, 2010

How to make a reusable Trick or Treat Bag!


Here's a way to make a reusable treat bag for your kiddos--or yourself--this Halloween!  :)  Just start with some cardboard, fabric paint, paint brush and a bag.  The bag can be homemade or not.  Here are a couple of how to's for bags you can use here or here.  You can control how involved you want this to be too!  Big or small bag, one color of paint or more, etc...  :)  The possibilities are endless!  (You can also experiment with different fabrics.)

The supplies . . .
Once you have your supplies in order, choose what design you would like to put on the bag.  You can sketch it on the bag with a pencil before painting or just wing it. ;)  (I sketched it beforehand.)  Place a piece of cardboard in the bag so they paint won't go through.  Then paint your design!  Again, possibilities are endless.  Princesses, Pumpkins, Cars, Animals, etc...  I did a little black cat, just like ours. :)

Finished Product!
 Let dry flat for 4 hours. (or more depending on the paint)  You can attach a strap or handle if desired.  Enjoy!  :)

This will be around for years to come, and you can always touch up paint as needed.  It's also washable, unlike some store-bought treat bags!  :)

Make your own pumpkin puree

This isn't rocket science, but I thought I would put up a little how to for your resource!  :)  Start out with a "Pie Pumpkin" which is a small pumpkin that is perfectly round and about 6-8" in diameter.  It should look like this one below.

 1.  Preheat the oven to 375 degrees.  Carefully cut the pie pumpkin in half and remove the seeds.  There are quite a few seeds--especially considering the size--so save them to roast!  :)
 2.  Place the halves on a baking sheet flat side down and bake for about an hour.  (Somehow I didn't get a pic of the seeded halves or them on the sheet before baking....)
3.  Once they have baked for an hour, they will look something like this....don't fret about all the creamted juices.  It happens, and isn't too hard to clean up.
4.  While the pumpkin is still hot out of the oven, carefully (with a spatula) turn over each half.  Then carefully remove the cooked flesh from the skin. (Put flesh in large bowl.) This is really easy because it's hot and all nice and cooked!  :)
 5.  Then once all the flesh has been removed from the pumpkin mash it up by hand or with a:  food processor, blender or mixer.  Then you can use it immediately (in pumpkin bread or some pie) or store in fridge for no more than 3 days.  You could also can it, and find instructions for doing so!  :)
 Yum...that makes me hungry....be on the look out for new pumpkin recipes this week!! :)

Some of the seeds I just roasted from my pie pumpkin.

Saturday, October 16, 2010

Cheese and Onion Enchilada Casserole

Well, this is basically just like this recipe, without the meat.  I'll go ahead and write do what I did in case you don't want to go to that one!  This sure was good....my favorite type of enchiladas.  Yum.  :)

Cheese and Onion Enchilada Casserole:
~12 corn tortillas
~2 c. cheddar cheese, shredded
Small or Medium Onion, diced
Enchilada sauce (homemade, mix with added water, canned...)  :)
Optional:  peppers, like jalepenos

1.  Get your ingredients...and preheat oven to 350 degrees.
 2.  Start layering tortillas on the bottom of a square baking dish.
 3.  Sprinkle about 1/2 of the onions on the tortillas.
 4.  Then sprinkle about 1/3 of the cheese on the onions.
 5.  Repeat steps 2, 3 and 4.  Then add another layer of tortillas and top with the remaining cheese.
 6.  Get your sauce ready and pour over the top.  (Notice the lone pepper on the top of mine...it was to denote which side I had added some peppers to....so I wouldn't accidentally end up with it!)  :)
 7.  Bake at 350 degrees for 20-25 minutes.  (I baked mine a little closer to 30 and it was getting rather crispy on top...still tasted good, but the 20-25 would work better!  :)
 Cut and serve!  Enjoy!  :)

Friday, October 15, 2010

Mickey D's Biscuits: Take I

Well, if you have ever had a biscuit from McDonald's you were probably amazed by it's fluffy texture inside and wonderful taste.  So, I have a desire to figure out how to make my biscuits taste that good at home, and I also had a request for it!  If you have any recipe requests just drop me a line! :)
Here's my first try at these little goodies.  I got the recipe from here, and they claim to have the actual recipes from McDonald's menu from the 50-70's.  It's some interesting stuff, I recommend at least taking a peek.  :)

Anyway, this round went well, and the turned out well.  I'm not too sure they taste a lot like McDonald's though. But I have some ideas as to why, and it has to do with what I used and not the recipe.  They are nice and fluffy in the middle though...  Anyway, I used fat-free buttermilk, and heart healthy bisquick instead of the regular version of both of those.  So, I have a sneaking suspicion the full fat version of this recipe would taste just like McDonald's.  So, I will have to try those soon.  Probably not till the rest of the fat free buttermilk I bought is gone though....  :)

Here's the recipe I used (on page 27) and I will write it below too.  Just a note, I did a half batch since I was just testing it, but I will write the full recipe below.)

McDonald's Biscuits:
2 c. Bisquick
2/3 c. Buttermilk
2 T. Margarine, melted and separated
1 t. Sugar
1/4 t. Salt


1. Preheat oven to 450 degrees.
2. Combine the baking mix, buttermilk, sugar, salt, and half of the melted margarine in a medium bowl. Mix until well-blended.
3. Turn dough out onto a floured surface and knead for about 30 seconds, or until dough becomes elastic. 

4. Roll dough to about 3/4 inch thick and punch out biscuits using a 3 inch cutter. Arrange the punched-out dough on an ungreased baking sheet, and bake for 10-12 minutes or until the biscuits are golden on top and have doubled in height.
5. Remove the biscuits from the oven and immediately brush each one with a light coating of the remaining melted margarine. Serve warm. 
Mhmmmm, enjoy!!   :)  Let me know what you think....and I will let you know when I try these with regular bisquick and buttermilk.  :)

Thursday, October 14, 2010

Roasted Seeds

It's that time of year again!  And you probably have some squash on your hands.  Which means you probably have some seeds too!  Why not roast them and eat them as a yummy snack?  It's not just for kids anymore, adult enjoy them too!  (At least I do!)  :)  Super simple and delicious!

Roasted Seeds:
Seeds (like from pumpkins, acorn or butternut squash)
Pepper
Paprika
Garlic Salt
Olive oil

1.  Start with your seeds.  They'll probably look like this....  So, you definitely will want to clean them off before roasting.  I just put them in a bowl and put some water in it and then move them around with my fingers.  You may have to actually pull some of the seeds out of the flesh too.  Then drain the water.
2.  After the seeds are clean, drizzle a tad bit of olive oil in the bowl and stir them around to coat.  Then place them on a baking sheet and spread them out.  Sprinkle with pepper, garlic salt and paprika. 
 3.  Roast the seeds in a 350 degree oven for about 5 minutes.  Then stir and roast for about 5 more minutes. Or long if you like them more roasted.  :)  I apparently forgot about mine a little bit today because some look rather roasted.  I will assure you that they all still tasted great! ;)
And here's some more seeds I just roasted that were from a tiny pie pumpkin!  (Those have a ton of seeds for their size!)

Rice Stuffed Acorn Squash


Rice (and veggie) Stuffed Acorn Squash
2 Acorn Squash
3 c. Rice, cooked
1 c. Carrots, diced
1/2 c. Onion, diced
1/2 c. Celery, diced
Salt/Pepper
Olive Oil
Cheddar Cheese optional for top

1.  Wash the acorn squash, dry and carefully cut them in half.  Then with a spoon (or your hand) remove the seeds and set aside.  (You can roast and eat them just like pumpkin seeds! :)
2.  Place 2-4 halves of the squash in your microwave for about 12 minutes.  (Depending on the size of your microwave, you may just have to do it one squash at a time.)
3.  While you are waiting on the micro, sauté the carrots, onion and celery in a tablespoon or so of Olive Oil.  Then remove from heat.
4.  Preheat the oven to 350 degrees.  Once the squash has been cooked in the micro, it will be time to scoop out some of the innards.  Start with a fork and go gently around the edge, and then down the middle.  Don't take out too much of the flesh because it is needed for stability.  Leave about 1/2" of flesh all the way around.  Save the flesh for the filling.
5. In a large bowl start mixing up the filling.  Add the rice, squash, carrots, onions and celery and mix.  Then add salt and pepper to taste.  It should look something like this.
 6.  Start filling the acorn squash halves.  Keep filling until the stuffing is gone.  There should be a nice mound on top of of each half of squash.
 7.  Once all of the squash are filled, bake in a 350 degree oven for 30 minutes.  (If you choose to top with cheese, put it on top when there are about 10 minutes left on the timer.)
 Serve and enjoy! :)

Tuesday, October 12, 2010

How to make Cloth Napkins!

Have you ever wanted to make these?  Well, I did.  I actually just wanted to buy some...but can't justify spending $10 for 4 of them....so naturally I decided to make some!  :)  I am still using fabric from that sheet set, so it's a steal of a deal.  So far out of a twin sheet set I have made two totes and two napkins!  Anyway, on to the how to...

Start out with a square of fabric.  You can really make these big or small.  I made 16" squares.
 Once you have squares you can start pinning the hems on the sides.  Be sure to fold it over twice, so it doesn't fray too much.  (Look at pics below.)  Then just pin around the whole square.
Finally, sew around the whole square and viola!  You've made a napkin that's green, reusable and cute!  :)
 Here you can see the two I just made.  I think they are pretty adorable, and I'm excited to use them for dinner.  Although...I think I will have to make quite a few more so we can use them everyday!  :)

Happy sewing!
Related Posts Plugin for WordPress, Blogger...